End of Summer Sewing Classes

Summer is slowly slipping away, but there is still time for me to teach a round of sewing classes.  I booked the classes today, and got right to work planning the projects.

Kid One (Starting high school) will be making a simple wrap skirt using Star Wars fabric:

Star Wars Characters In Blocks Cotton Fabric

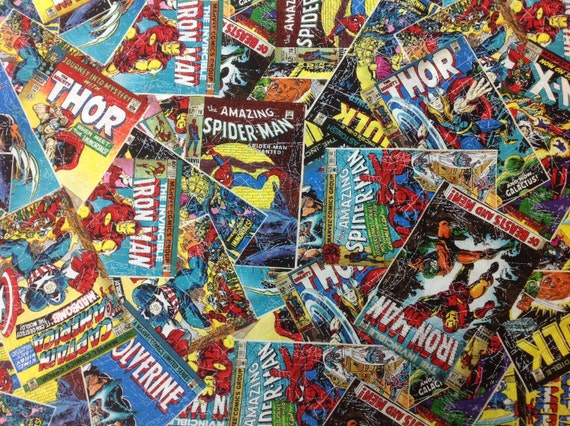
I’m going to make a sample this weekend, using this amazing fabric:

I’m sure the skirt will come in handy if we have a Superhero Spirit Day at school this year!

Kid Two (Elementary School Boy)  is finishing his super bunny from last year, and hopefully making a shark bag (photos to come!)

Kid Three (Elementary School Girl) has two options: 1. Make Elsa and Anna hand puppets, or 2. learn how to use a sewing machine, and make a felt flower garland.

Photos of samples and finished projects to come!

Posted in Simple Sewing, Uncategorized | Leave a comment

Summertime Projects

I’ve been enjoying my first summer off since high school.  I always took summer classes, or worked, as a college student, and worked at mostly year-round schools.  This was the first year that I was able to just be during the summer, and it is fantastic!

So, what have I been doing?  Well, I have been writing a lot of curriculum for the upcoming school year, but that has been really fun.  I did a lot of reading, I’m almost caught up with my book club, but my stack of comics never seems to get smaller.  I went on vacation to New Hampshire with the mister.  In addition to spending quality time with my parents, we did several day trips to Boston and Maine.  A highlight was a visit to Knight’s Quilt Shop in Maine.  There has also been crafting, lots and lots of crafting.

Art Journal

One of my goals for next year is to do an art lesson at least every other month.  To that end, I downloaded a bunch of art lesson resources and am drafting a year-long curriculum binder for my class.  Since I learn best by doing, I created samples of most of the lessons that I will be teaching starting in the fall.  A great resource is the Art Projects for Kids blog.   I was able to download an elements of art pack along with a pack that covers great artists for $5 each.  All of her projects are available for free, but since she has hundreds of projects, it is easier to buy the packs rather than search through to find what you need.

One of my favorite lessons is the Britto inspired cat, using layered color to add texture:

Britto Cat

I’m still adding new samples and lessons to my art journal, and it continues to make me happy each time I work in it!

Inference Rooms

I love miniatures.  I had a dollhouse when I was a child, and was devastated when it was given away.  On a recent trip to Michaels, I found myself in the miniatures section and was drawn to some of the craft themed items.  Next thing I knew, my basket was full of adorable little things that reflected my personality and interest.

I looked at this basket and wondered what to do with all this darling little things, and then it hit me- teaching inferences.  At the start of our reading program, we teach about how to make inferences using evidence from the text.  Last year, I used my purse as a way to concretely teach this concept, but could I use these miniatures instead?  I bought a wooden box that I could use as a diorama, and some good glue, and went home to paint and plan.

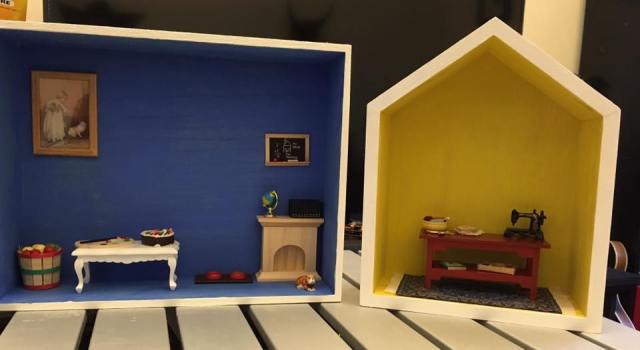
Unfortunately, I had bought so many things, that they didn’t all fit in one “room” so I found a little house-shaped shadow box at Target and decided to up the difficulty factor of the lesson.  I sorted the items into two “themes” and created two different rooms.  Will my students be able to infer that both rooms represent my interests?

Inference Rooms

The yellow room needs a little something more, so I ordered these from Amazon to go on the walls.

This was a really fun project to work on, and I hope that the lesson works!

Stitching

I subscribe to Stitchy Box as a way to get fun threads and fabrics for stitching projects, and every so often they have special kits for sale.  I bought a lovely thread palette kit designed by Keslyns, and have been stitching away at the medallion for the center.  I am almost finished, and can’t wait to finish putting the palette together!

Medallion

Our guild did a “make and take” at the county fair, so I had a lovely evening chatting with the ladies and making this little fellow:

Minion

I still have about two and a half weeks left of summer, so happy crafting!

Posted in Needlecrafts, Other Projects | Leave a comment

Prize Winning Stitching

This year I finally mustered up the courage to enter two of my pieces in the Marin County Fair.  I selected on project that I did through my guild (the bird button from my last post) and a bird in cage from a CrossStitcher kit.

I was a little nervous when the time came to see my pieces in the exhibit hall at the fair, but the nerve were quickly dismissed when I found out that I had one 3rd place for my button, and 1st place for my bird in cage!

The comments from the judges were quite encouraging, and next year I plan on entering more pieces, and maybe even a small quilt!

Bird in Cage

1st Place Bird in Cage

Finished button

3rd Place Button

Posted in Needlecrafts | Tagged , | Leave a comment

The Art of Letting Go

When it comes to stitchery, I am a very literal person.  I like to do cross-stitch because the stitches and colors are so precise.  I rarely design my own projects, and lord help me if I have to pick my own colors.  Since joining a guild, I have been trying to open myself up to new stitching styles and to new challenges.  My newest project is forcing me to let go.

I have to let go of the need to know which stitch goes where, and what color to use in each space.  My latest project, a button brooch from Gary Clarke Designs, is a project with a picture for “inspiration” but little to no instructions.  I can use whatever stitches in want, in any direction, and in any color.  To add to that, the piece is tiny, so the stitches are as well.  This piece is so small that I have to use a quilting between needle!

In terms of the stitch layout, I’m sticking fairly close to the inspiration picture.  This is making it slightly easier, but it is still unnerving to place my stitches willy nilly!  For the colors, I am using a palette of colors that I had gathered for another project.  They are quite different from the inspiration picture, but I think that they are working quite well.

I was able to stitch for almost two hours tonight, and I’m pretty close to being finished.  I need to finish one of the birds, do some outlining, and add in the little details before putting the fabric into the button frame!

Guild Project

Two little birdies sittin’ in a tree…

Perspective

My thumb for perspective on how tiny the stitches are.

Posted in Needlecrafts, New Skills | Tagged , , | Leave a comment

Greetings From Beyond Grad School

Well, I finally finished my biggest project!  I completed my 56 page thesis and will be marching in the graduation ceremony this May!  It feels amazing to have completed this labor of love, and to slowly reenter the life I had to somewhat set aside.

What does reentry look like?  For starters, I have been able to read for pleasure again, and have completed 5 books since the end of grad school!  I also joined the Marin Golden Threads and have been exploring new skills and projects in embroidery and other needle arts.

My work life has been keeping me busy as well.  I currently wrangle a wonderful class of fourth graders at a fantastic public school in Marin County.  Life as a first year teacher has been full of work, but it has been very joyful work indeed!

This is the year of “finishing.”  Finishing books, finishing projects, and finishing my reentry into “normal” life!

Posted in Totally Off-Topic | Leave a comment

Project Journal: Hexagons!

What: 35-99 Sets of 6 EPP Hexagons for the 10th Hexagon Swap

Theme: Fall Colors (I’m not posting the fabric until the sets are done)

Date Started: Monday, May 5

Estimated Time Needed to Complete: 15 Hours

Expected Finish Date: Monday, May 26

Expenses: $36- Fabric, $6- pins

Thoughts as I Start:  I’m very excited to start this project.  Part of that excitement is knowing that my work will be included in another person’s finished project!  I’m also excited to see what fabric I get in return.

5/5- 1 Hour- Prepped and cut 3 fabrics for the swap.  I need to go to the store and get at least 2-3 more fabrics.

5/6- 1 Hour- Prepped the remaining 6 fabrics.  Pinned the first set and began trimming the hexies for basting.

Thoughts After I Finish: Coming Soon!

Posted in Project Journal | Tagged , , , , | Leave a comment

Simplicity Learn to Sew Patterns- Not So Easy!!

One of my former theater peeps, has embarked a new venture- a quality hair salon for kids.  Thus was born Purple Monkey Hair: A Salon for Kids and Kids at Heart!  Since she has an ADORABLE toddler, she asked me to make him a purple monkey costume for the grand opening celebration.  I found a Simplicity Learn to Sew pattern that looked pretty quick and easy, and got to work.

Oh Simplicity, how you let me down!  The instructions were so hard to follow that I can’t believe the pattern is being marketed at “learn to sew.”  I muddled through, but it was REALLY challenging!

Yesterday was the grand opening at the salon, and I  must say that the Purple Monkey was pretty darn adorable!

Purple Monkey

Posted in Simple Sewing | Tagged , , | Leave a comment

Whew- Time Flies!!

I can’t believe it is already November!! I haven’t posted in a while because I have been in a whirlwind of school observations, classes, homework and work! I have been sewing and crafting, though mostly classroom related things, and just taught my first class to a new student this morning! I was also commissioned to make a costume for an adorable toddler, so he could represent his mother’s new business!

I haven’t been able to do much personal sewing, and I do miss it. I’m looking forward to the Thanksgiving Break, and the luxury of three whole days in row with no responsibilities!!!

I will be posting another update soon, but bye for now!!

Posted in Uncategorized | Leave a comment

Teacher Hacks: Making Cool Math Things for School

I am currently in my observation phase of my teaching credential program.  This means that I am placed at the school where I will be student teaching in January, and I am expected to start teaching lessons in about a month.  Well, since I am an experienced teacher (6 years of Pre-K) I am actually starting tomorrow!  I will be leading a month long project on playwriting and producing for the 1st grade portion of the K/1 class I am working with, and a lesson on graphs for the whole class.  My professor suggested that I go ahead and write up full lesson plans for the first playwriting lesson and the math lesson, even though she will not be observing them.  So, I spent the day writing up the lesson plans.

For the graphing lesson, we are going to eat two different kinds of apples, and chart which one the class likes the best.  I decided to make a reusable foam core chart with contact paper and painters tape.  This way, I can use dry erase markers on the chart, and the tape is repositionable if I want to add more categories.  For the little guys, I am writing their name on star shaped Post-It notes so they can mark their choices.

Here is the chart:

Graphing Chart

I’m so excited to do my lesson on Wednesday and try this out!

Tomorrow afternoon, I have my Teaching Math in Elementary School class.  For my assignment I had to play 5 math games with friends, family or kids.  We were all given a list of a bunch of different games and asked to write down our observations about the games for class tomorrow.  I recruited three of the high school students at work, and the daughter of one of the other dorm parents to come and play with me.  We had so much fun playing games last night!  I didn’t have all of the materials that I needed to play all of the games, so I looked through the game descriptions to see what I could repurpose.  Two different colored decks of playing cards became a game board, the metal-edged plastic discs from my magnet box became counters, and graph paper became a Multiplication Tic-Tac-Toe board and “button” game boards.

"Button" game boards on the top, and the Multiplication Tic-Tac-Toe Board is on the bottom!

“Button” game boards on the top, and the Multiplication Tic-Tac-Toe Board is on the bottom!

I used the rest of the contact paper to “laminate” the paper, so now I have more durable game boards to add to teacher toolkit!

My growing folder of math games!

My growing folder of math games!

If you want more detailed instructions on the chart, or the math games (I have a whole stack of good ones!) please send me an email, and I’ll be happy to fill you in!


Posted in Totally Off-Topic | Tagged , , , , , , | Leave a comment

Making a Pouch for the Breaking of the Glass Ceremony

Aug. 17, 2013

My best friend’s sister is getting married, and is in need of a pouch to hold the wineglass that her new husband will smash at the end of the ceremony (for information on this tradition, click here).  She supplied me with the one for my wedding, so I am happy to return the favor!

I spent the morning thinking about what I wanted to to look like, and decided to do a deep blue satin, covered with a silver gauzy fabric.  I am going to join the fabric with embroidery.  The embroidery will be the couple’s name, the date, and a Star of David.  The pouch will be a drawstring one with a matching silver, gauze ribbon.  This will be my first time using the waste fabric method to add the embroidery and cross-stitching, so I am very excited!!!  This is also my first opportunity to use my new Janome Sew Mini Sewing Machine!

Aug. 24, 2013

So here’s what happened, and a tutorial for how to use (and what not to do) waste fabric for embroidery!

Materials

Materials

The gauze over the satin- so pretty!

The gauze over the satin- so pretty!

Waste Fabric

Waste Fabric

I used my wineglass to measure the fabric.  I bought a quarter yard of each fabric, and it needed only a little bit of cutting.  Once the fabric was cut, I rolled the side edges and pinned it so the interior edges would be clean.

rolled edge for interior of bag

rolled edge for interior of bag

I used a zig zag stitch for the interior side seams:

zig zag

After stitching, I positioned the waste fabric on the gauze and satin and secured it with a hoop.  It was very hard to use the hoop with the waste fabric (it probably would have been better to follow the directions and tack the fabric down with a basting stitch, but I didn’t want to put unnecessary holes in the delicate fabric) but I finally figured it out and started to cross stitch!  The waste fabric came with a really nice scripted style alphabet that I used to write the names of the bride and groom:

sample stitching

Three hours later:

3 hours later

Once I finished the lettering, I needed to trim the waste fabric to make it easier to remove the threads:

trimmed

This was when disaster struck!  I had been working on this project for about 5 hours by this point, and accidentally cut a tiny hole in the gauze when  I was trimming the waste fabric.  ARGH!!!!  I decided that I would take a very deep breath, finish the project, get a good night’s sleep and fix it in the morning.

So, the next step would normally be to delicately unweave the waste fabric thread by thread, but I was worried about not finishing the bag before it was time to leave for the wedding the next morning, so I moved on to finishing the bag.  I knew that I would be able to pull the threads the next day during the 2 hour car ride.

The next step was to sew up the sides of the folded fabric to make a bag:

side seam

Then make a casing for the matching gauze ribbon:

casing

By this time, I HAD to know what the final bag would look like, so I started to remove the threads (don’t make the mistake that I made and just use your fingers, tweezers are necessary for this part!) one, by one:

threads

Very tedious!

slow reveal!

slow reveal!

Finished!

Finished!

The pictures don’t really do the fabric/thread combination justice.  It was really, really lovely!

So, I got my good night’s sleep and woke up the next morning and reached into my bag of tricks.  Luckily the cut was very small, and I had some small, Star of David beads in my kit.  Originally, I wanted to cross-stitch the Star above their names, but the pattern I had was very complicated, and I was running out of time.  The bead helped fix the tear, and bring the Star back in!

Yay!

Yay!

So, it’s not perfect, but the couple loved it, and that is really all that matters!

Here are my tips if you plan to use waste fabric:

  1. if possible tack the fabric down with basting stitches,  a hoop is really challenging
  2. sketch out your pattern on the fabric giving you a template to work with
  3. be VERY careful when trimming the fabric
  4. use tweezers to remove the threads of the waste fabric


Posted in Needlecrafts, Other Projects | Tagged , , , , | Leave a comment